User Account Settings
A guide to managing your account settings, security, and financial information on TradePoint.
1. Introduction
Your TradePoint account settings allow you to manage three critical aspects of your account:
- Identity Verification (KYC) - Proving who you are to comply with regulations
- Two-Factor Authentication (2FA) - Adding an extra layer of security to protect your account
- Withdrawal Addresses - Managing the wallet addresses where you receive your asset proceeds
This guide will walk you through each of these features step-by-step in plain language, even if you’re not familiar with cryptocurrency or technical terms.
2. Identity Verification (KYC)
What is KYC?
KYC stands for “Know Your Customer.” It’s a security and regulatory requirement where you prove your identity to the platform. Think of it like opening a bank account - you need to show identification before you can use certain services.
Why is KYC Required?
- Regulatory Compliance: Financial platforms must verify who their users are to prevent fraud and money laundering
- Asset Security: It protects both you and the platform from unauthorized access
- Access to Features: You must complete KYC before you can receive distributed tokens or use automated trading features
Who Needs to Complete KYC?
Everyone who wants to:
- Receive distributed tokens
- Use automated trading features
- Withdraw proceeds from token trades
[!IMPORTANT] You cannot receive any distributed assets or proceeds until your identity is verified and approved.
Step-by-Step: How to Complete KYC
Step 1: Navigate to Identity Verification
- Log into your TradePoint account using your Google account
- Look for the main menu or dashboard
- On “Identity Verification” Click “Start KYC”
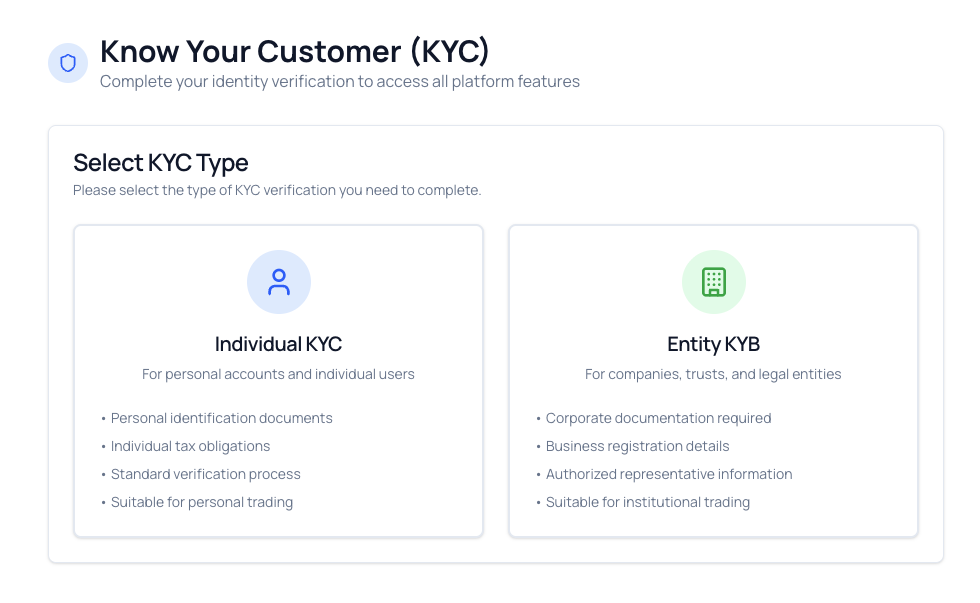
Step 2: Choose Your Verification Type
You’ll see two options:
Option A: Individual (Personal Account)
- Choose this if you’re verifying yourself as a person
- You’ll use your personal identification documents
- This is the most common choice for individual users
Option B: Entity (Business/Company Account)
- Choose this if you’re verifying on behalf of a company or organization
- You’ll need business registration documents
- Additional company information will be required
[!TIP] If you’re unsure which to choose: Are you receiving tokens personally or on behalf of a company? If personally, choose Individual.
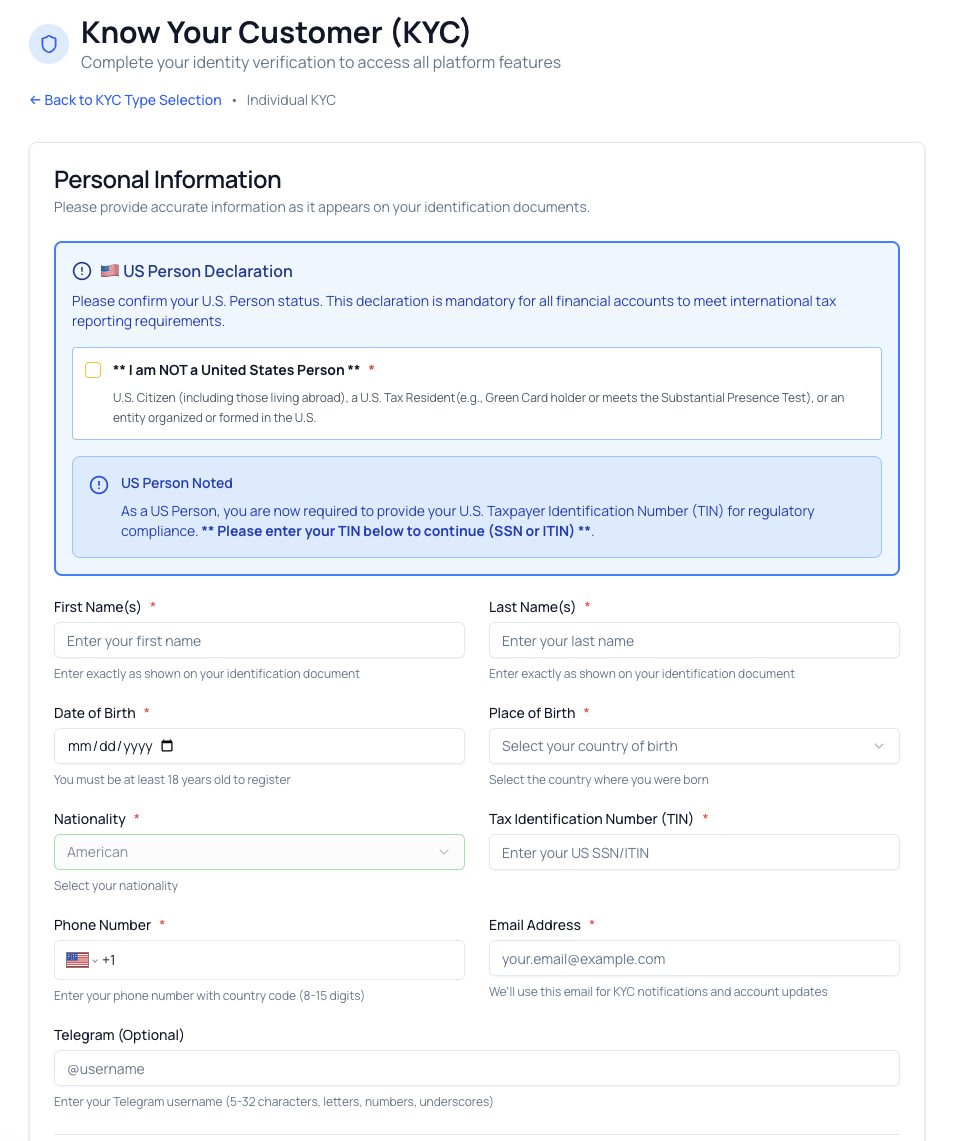
Step 3: Provide Personal Information (Individual)
If you selected Individual, you’ll need to fill in:
US Person Declaration:
- Confirm you are NOT a United States Person - This is a mandatory declaration before proceeding
Personal Information:
- First Name(s) - Must match your ID exactly
- Last Name - Must match your ID exactly
- Date of Birth - Use the date picker provided
- Place of Birth - Country where you were born
- Nationality - Your citizenship country
- Country of Residence - Where you currently live
- Address - Your current residential address
- Phone Number - Include country code (e.g., +1 for USA, +44 for UK)
- Email Address - Usually pre-filled from your account
- TIN (Tax Identification Number) - Optional
- Telegram - Optional
Employment Information:
- Occupation - Your current job title or profession
- Employment Type - Employed, Self-Employed, Unemployed, Retired, Student, or Homemaker
- Employer Name - Shown if Employed is selected
- Self-Employment Nature - Shown if Self-Employed is selected
Source of Wealth: Select all that apply:
- Inheritance
- Sale of Property/Assets
- Employment
- Service Holdings
- Other
You will also need to provide a written explanation of your wealth sources in a details field.
[!CAUTION] Make sure all information matches your identification documents exactly. Even small differences (like “Bob” vs “Robert”) can cause your verification to be rejected.
Step 3B: Provide Entity Information (Business)
If you selected Entity, you will complete a Know Your Business (KYB) form with four steps:
Step 1 — Company Information & Authorized Person:
Company Information:
- Company Name - Official legal name
- Registration Number - Company registration or tax ID number
- Date of Incorporation - When the company was officially registered
- Business Address - Official registered address
- Business Type - Corporation, LLC, Partnership, Trust, or Other
- Contact Phone - Company contact number
- Contact Email - Company contact email
- Company TIN - Tax Identification Number
Authorized Person:
- First Name and Last Name - The person submitting on behalf of the company
- Title/Position - Your role (e.g., CEO, CFO, Director)
- Phone and Email - Contact details
- Date of Birth and Telegram - Optional
This step also requires uploading the required entity documents (see Step 4 below).
Step 2 — Shareholders:
Add details for all company shareholders, including:
- Personal information (same fields as Individual KYC)
- Ownership percentage
- Each shareholder with 10% or more ownership must provide individual KYC documentation or entity documentation
Step 3 — Directors:
Add details for company directors with their personal information and identification documents.
Step 4 — Review & Submit:
Review all entered data and confirm the Information Accuracy Declaration before submitting.

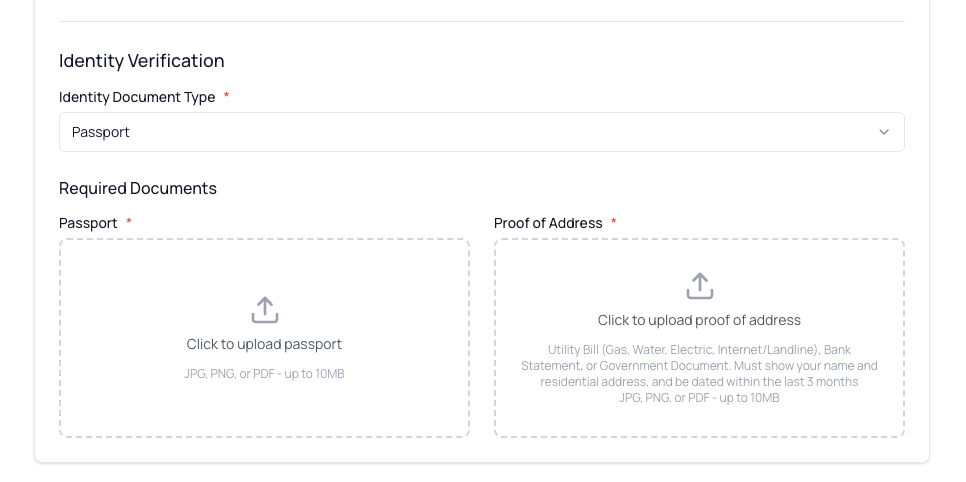
Step 4: Upload Identification Documents
This is the most important part. You’ll need to provide clear, readable photos or scans of your documents.
For Individuals, you need TWO types of documents:
Document Type 1: Government-Issued Photo ID
Choose ONE of the following:
- Passport (recommended - easiest to verify)
- National Identity Card (both front and back)
Document Type 2: Proof of Address
Must be dated within the last 3 months. Choose ONE of the following:
- Utility Bill (gas, water, electricity, internet/landline)
- Bank Statement
- Government Document (tax document, official correspondence)
[!IMPORTANT] Your proof of address must clearly show:
- Your full name
- Your complete residential address
- The issue date (must be within last 3 months)
- The issuer (company or government agency)
For Entities, you need ADDITIONAL documents:
- Certificate of Incorporation (required)
- Memorandum & Articles of Association (required)
- Register of Shareholders (required)
- Register of Directors (required)
- Company KYB Form (required — a downloadable template is provided in the form)
- Company TIN Document (optional)
- Other Supporting Documents (optional)
[!NOTE] Document names may differ by jurisdiction (e.g., Public Deed, Statutes, etc.). You must submit the documents that legally prove the company's registration, internal rules, directors/managers, and final ownership structure. If your jurisdiction issues a formal Register of Ultimate Beneficial Owners (UBOs), it must be included.
How to Take Good Document Photos
Follow these tips to avoid rejection:
✅ DO:
- Use good lighting (natural daylight works best)
- Place the document on a flat, contrasting surface (e.g., dark document on white background)
- Ensure all four corners of the document are visible
- Make sure all text is clear and readable
- Take photos directly from above (not at an angle)
- Use a camera with at least 5MP resolution (most modern phones are fine)
- Save in common formats: JPG, PNG, or PDF
❌ DON’T:
- Use flash (it can create glare)
- Take blurry or out-of-focus photos
- Cover any part of the document with your fingers
- Edit or alter the document in any way
- Use photocopies (must be original documents)
- Submit expired documents
[!NOTE] [PLACEHOLDER: Side-by-side comparison showing good vs bad document photos]
Step 5: Upload Your Documents
- Click “Choose File” or “Browse” next to each document type
- Select the photo or scan from your computer or phone
- Wait for the upload to complete (you’ll see a checkmark or progress bar)
- Review the uploaded image - can you read all the text clearly?
- If not clear, delete and upload a better photo
File Requirements:
- Maximum file size: 10MB per file
- Accepted formats: JPG, JPEG, PNG, PDF
- Multiple pages: If your document has multiple pages (like a passport), you may need to upload each page separately or combine them into one PDF
Step 6: Review and Submit
- Double-check everything:
- Is all information spelled correctly?
- Do your uploaded documents match the information you entered?
- Are all required fields completed?
- Can you clearly read all uploaded documents?
- Read the Information Accuracy Declaration - You must scroll through the terms box, then check two confirmation boxes:
- “I have read and understood the Information Accuracy Declaration above...”
- “I confirm that all the data provided above is true and accurate...”
- Click “Submit Individual KYC Application” to submit for review
- You’ll see a confirmation message that your documents have been received
[!TIP] You can also click ”Save as Draft” at any time to save your progress without submitting. You can return later to complete and submit your application.

Step 7: Wait for Review
What happens next:
- Submission Received: Your documents enter the review queue
- Under Review: An administrator will carefully check your documents (usually takes 1-3 business days)
- Decision: You’ll be notified of the outcome
You’ll see one of these statuses:
✅ Approved: Your identity is verified! You can now use all platform features.
🔄 Submitted: Your documents have been received and are in the review queue.
⏳ Under Review: An administrator is actively reviewing your documents.
⚠️ More Info Needed: Additional information or documents are required. Check the note from the reviewer and resubmit.
🔁 Resubmitted: You have provided updated information and it is back in the review queue.
❌ Rejected: Your submission did not pass verification. Your account will be locked and you will not be able to access platform features until the issue is resolved.
[!WARNING] When your KYC is rejected, your account is automatically locked. You cannot resubmit on your own — you must contact support to resolve the issue and unlock your account.
Common rejection reasons:
- Documents are blurry or unreadable
- Information doesn’t match between form and documents
- Documents are expired
- Proof of address is older than 3 months
- Photo ID doesn’t clearly show your face
- Documents appear to be edited or tampered with
If rejected:
- Read the rejection reason carefully
- Contact the support team — explain the issue and what you will provide to resolve it
- Support will unlock your account and guide you through resubmission
 Approved KYC Verification
 Under Review KYC Verification
 Rejected KYC Verification
What If I Need to Update My Information?
After approval:
- Your verified information generally cannot be changed directly by you
- Contact your system administrator if your details have changed (e.g., you moved to a new address)
- You may need to submit new documents to verify the updated information
3. Two-Factor Authentication (2FA)
What is Two-Factor Authentication?
Two-Factor Authentication (2FA) adds an extra layer of security to your account. Instead of just using your password (something you know), you also need your phone (something you have).
Think of it like your bank’s ATM: you need both your card (something you have) and your PIN (something you know).
Why Use 2FA?
- Protect Your Assets: Cryptocurrency and distributed tokens are valuable - 2FA prevents unauthorized access
- Required for Sensitive Actions: You must enable 2FA before you can add or manage wallet addresses
- Peace of Mind: Even if someone steals your password, they can’t access your account without your phone
[!IMPORTANT] You must enable 2FA before you can manage withdrawal addresses.
What You’ll Need
Before you begin, you need:
- Your TradePoint account (logged in)
- A smartphone (iPhone or Android)
- An authenticator app installed on your phone:
- Google Authenticator (recommended, free)
- Authy (free, has cloud backup)
- Microsoft Authenticator (free)
- 1Password (paid, includes password manager)
[!TIP] We recommend Google Authenticator or Authy - they’re free, secure, and easy to use.
Step-by-Step: Installing an Authenticator App
If you don’t already have an authenticator app:
For iPhone:
- Open the App Store
- Search for “Google Authenticator” or “Authy”
- Tap “Get” then “Install”
- Open the app once installed
For Android:
- Open the Google Play Store
- Search for “Google Authenticator” or “Authy”
- Tap “Install”
- Open the app once installed
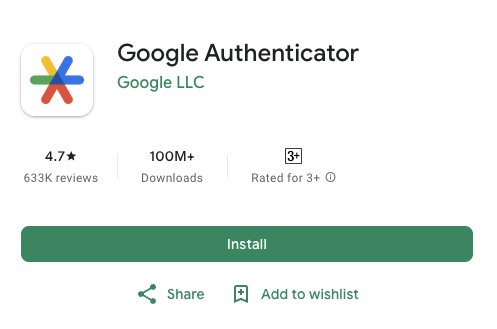
Download from: Google Play Store
Step-by-Step: Setting Up 2FA on TradePoint
Step 1: Navigate to Account Settings
- Log into your TradePoint account
- Click on your profile icon or “Account” in the menu
- Look for “Security” or “Two-Factor Authentication” section
[!NOTE] [PLACEHOLDER: Screenshot showing where to find the Security/2FA section]
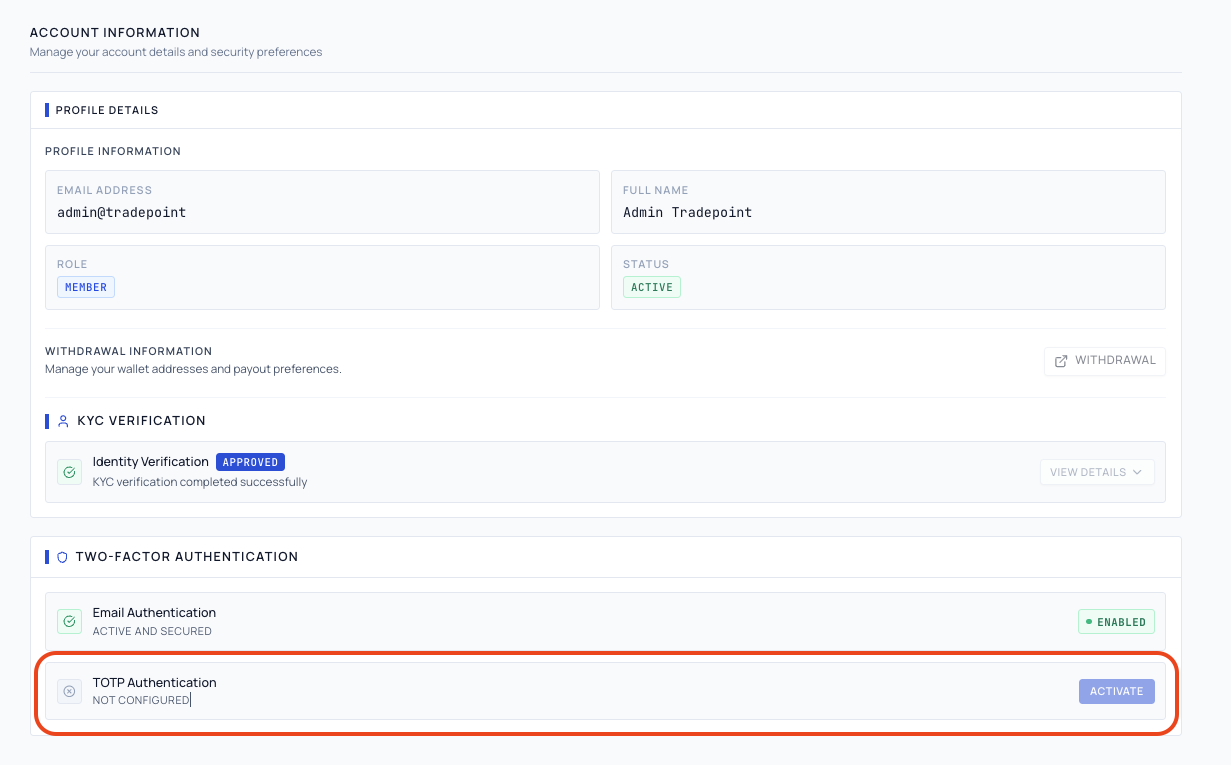
Step 2: Start Activation
- Find the ”TOTP Authentication” section under ”Security Protocols”
- You’ll see a status showing ”Not configured”
- Click the ”Activate” button
Step 3: Scan the QR Code
A "TOTP Configuration" dialog will appear showing:
- A QR code (a square black-and-white pattern)
- A Manual Entry Key (a long string of letters and numbers)
To link your authenticator app:
- Open your authenticator app on your phone
- In the app, tap the “+” button or “Add account”
- Choose “Scan QR code” or “Scan barcode”
- Point your phone’s camera at the QR code on your computer screen
- Your phone will beep or vibrate when it successfully scans
Alternative method (if camera doesn’t work):
- In your authenticator app, choose “Enter key manually”
- Give it a name: “TradePoint”
- Type in the secret key exactly as shown (or copy and paste it)
- Ensure “Time-based” is selected
- Tap “Add” or “Done”
[!TIP] Save the secret key! Write it down and store it in a safe place. If you lose your phone, you’ll need this key to restore your 2FA.
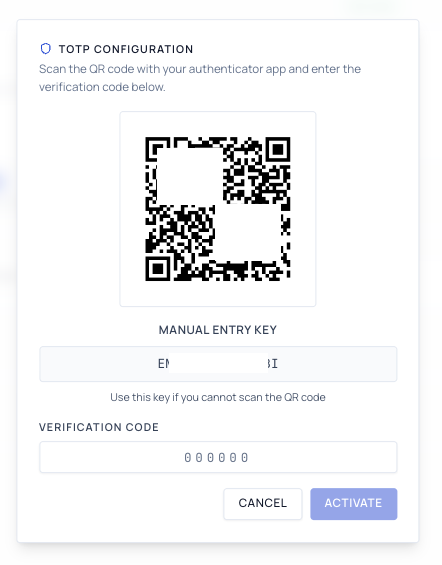
Step 4: Enter the Verification Code
After scanning the QR code, your authenticator app will immediately start showing:
- “TradePoint” (or whatever name you gave it)
- A 6-digit code (e.g., 123 456)
- A countdown timer (usually 30 seconds)
To complete setup:
- Look at the 6-digit code in your authenticator app
- Type this code into the “Verification Code” or “Enter Code” box on TradePoint
- Click “Activate” or “Confirm”
[!CAUTION] The code changes every 30 seconds! If it’s about to expire (timer almost at zero), wait for the new code and use that instead.
Step 5: Success!
If the code was correct, you’ll see:
- ✅ A success message
- Your 2FA status changes to ”Active and secured” with an ”Enabled” badge

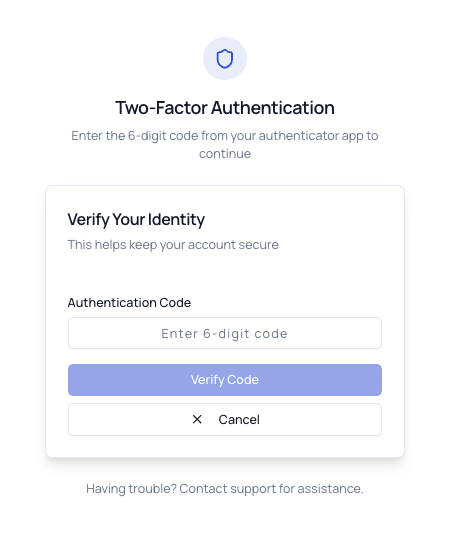
Using 2FA When Logging In
Once 2FA is enabled, you’ll need to provide a code every time you log in:
- Click “Sign in with Google”
- After successful login, you’ll see a “Enter 2FA Code” screen
- Open your authenticator app
- Find “TradePoint” in your list
- Type the current 6-digit code
- Click “Verify Code”
- You’re logged in!
[!TIP] The code changes every 30 seconds
What If I Lose My Phone?
Option 1: Use the Secret Key
- If you saved the secret key from setup, enter it manually into your authenticator app on a new phone
- Your codes will work again
Option 2: Contact Support
- If you have not the secret key, contact your system administrator
- They can disable 2FA for you, but will need to verify your identity first
- This process may take several days for security reasons
[!CAUTION] Always save your secret key Without them, losing your phone means losing access to your account.
Disabling 2FA
If you need to temporarily disable 2FA (not recommended), you need to contact your system administrator. They can disable 2FA for you, but will need to verify your identity first.
[!WARNING] Disabling 2FA makes your account less secure. You also won’t be able to manage your withdrawal addresses without 2FA enabled.
4. Withdrawal Address Management
What are Withdrawal Addresses?
Withdrawal addresses are the cryptocurrency wallet addresses where you want to receive your asset proceeds (proceeds from traded tokens or distributed tokens). These are managed through the Payout page.
Think of it like adding your bank account number to your employer’s payroll system - you need to tell TradePoint where to send your money.
Why are Withdrawal Addresses Important?
- Receive Proceeds: You can only receive withdrawals at verified addresses linked to your tokens
- Security: The verification process (including a test withdrawal) ensures you actually own the addresses you add
- Per-Token Binding: Each token is linked to a specific withdrawal address. You can reuse the same address across multiple tokens if the network is compatible
[!IMPORTANT] You must have TOTP two-factor authentication enabled before you can add or manage withdrawal addresses.
What You’ll Need
Before adding an address:
- TOTP 2FA Enabled - You must complete TOTP two-factor authentication setup first (see Section 3)
- A Cryptocurrency Wallet - Where you want to receive funds (e.g., hardware wallet, exchange account)
- The Wallet Address - The specific address on the correct blockchain network
Understanding Wallet Addresses
What is a wallet address? A wallet address is like your account number in the cryptocurrency world. It’s a long string of letters and numbers that identifies where funds should be sent.
Example addresses (these are for illustration only — do not send funds to these):
- Ethereum:
0xEXAMPLE000000000000000000000000000000001 - Solana:
EXAMPLESOLANAADDRESS111111111111111111111111 - XRP:
rEXAMPLEXRPADDRESS000000000000000
[!CAUTION] Different cryptocurrencies use different address formats. Sending to the wrong network will result in permanent loss of funds!
Step-by-Step: Adding a New Address
Step 1: Access the Payout Page
- Log into TradePoint
- Go to ”Account”
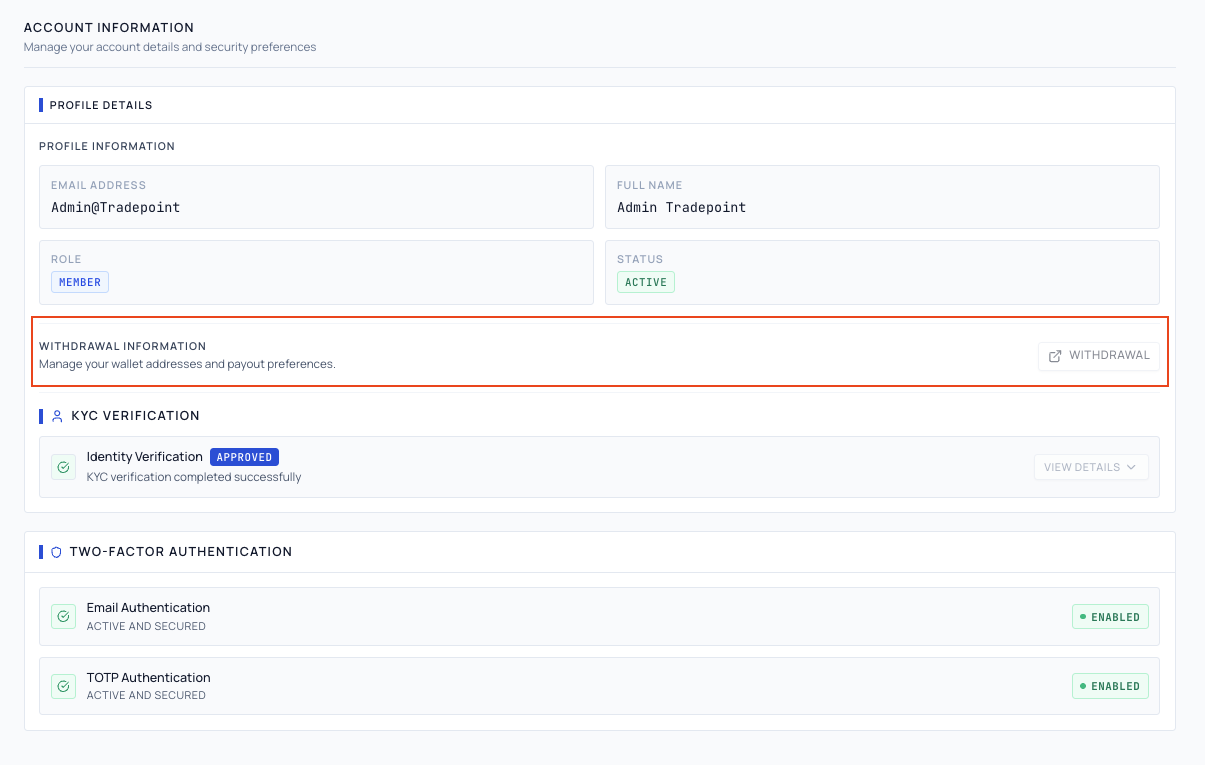
- Look for the ”Withdrawal Information” section
- Click ”Withdrawal” (opens in a new tab)
[!NOTE] The Withdrawal Information section is only visible to members. Admin users do not see this section.
 Access to Withdrawal Information
Step 2: Select a Token to Set Up
The Payout page displays your portfolio assets. Each token shows its current address status. To add a new address:
- Find the token you want to set up a withdrawal address for
- Click the ”Setup Address” button next to the token
[!NOTE] If you see a message saying “TOTP Required,” you need to enable Two-Factor Authentication first (see Section 3). You must have 2FA enabled before you can add or manage addresses.
Step 3: Enter Address Details (Step 1 of 3)
A dialog will appear with a 3-step process. In the first step, you can either select an existing compatible address or add a new address.
To add a new address:
Field 1: Address
- What it is: The actual wallet address where you want to receive funds
- How to get it: Copy it directly from your wallet or exchange
- Format: A long string of letters and numbers
- Validation: As you type or paste, the system will check if the format is correct for the selected network
Validation indicators:
- ✅ Green checkmark: Address format is valid for the selected network
- ❌ Red X or warning: Address format doesn’t match the network, or contains errors
[!TIP] Always copy and paste addresses - never type them manually. One wrong character means lost funds!
Field 2: Network
- What it is: The blockchain network for this address
- How to choose: Select from the dropdown menu (only networks compatible with the selected token are shown)
[!CAUTION] Make absolutely sure you select the correct network! For example, if you have a Polygon wallet, select “Polygon” - if you select “Ethereum” by mistake, the funds could be lost.
Click ”OK” to proceed to the review step.
Step 4: Review and Send Test Withdrawal (Step 2 of 3)
The review step shows a summary of your address details and a test withdrawal fee breakdown:
| What to Check | Why It Matters |
|---|---|
| Token | Confirm the correct token is selected |
| Network | Wrong network = lost funds |
| Address is correct | Wrong address = lost funds |
| Test withdrawal amount and fee | Review the fee breakdown before proceeding |
[!CAUTION] Triple-check your address! Once funds are sent to the wrong address, they cannot be recovered.
[!NOTE] A small test withdrawal will be sent to your address within 24 hours. You must confirm the transaction once you receive it to complete the address binding.
Click ”Send test” to proceed to 2FA verification, or ”Back” to edit your details.
Step 5: Verify with 2FA (Step 3 of 3)
- A Two-Factor Authentication dialog will appear
- Open your authenticator app on your phone
- Find the 6-digit code for TradePoint
- Enter the code in the dialog
- Click ”Verify & Continue”
If successful:
- ✅ You’ll see a success message: “Address created and test withdrawal initiated”
- ✅ The address is created and a test withdrawal is being processed
- ✅ The token’s status changes to ”Sending test” in your portfolio
If there’s an error:
- ❌ Read the error message carefully
- Common issues:
- Invalid 2FA code (code expired - try again with fresh code)
- TOTP setup required (enable 2FA first)
- Insufficient funds for the test withdrawal
Understanding Address Statuses
After adding an address, it goes through a verification workflow. Your portfolio shows the current status for each token:
| Status | Meaning |
|---|---|
| No Address Set | No withdrawal address configured for this token |
| Sending test | Address created, test withdrawal is being processed |
| Test successful | Test withdrawal sent successfully, awaiting your confirmation |
| Bound | Address verified and ready for withdrawals |
| Send test failed | Address verification was rejected or failed |
Address Verification Workflow:
- Sending test - You add an address and a test withdrawal is initiated
- Test successful - The test withdrawal arrives at your address. You must click ”Confirm” to verify you received it
- Bound - After confirmation, the address is active and ready for full withdrawals
[!IMPORTANT] You must confirm receipt of the test withdrawal to activate your address. Until confirmed, you cannot make full withdrawals for that token.
Confirming a Test Withdrawal
When your address status shows ”Test successful”, you need to confirm receipt:
- Go to your Payout page
- Find the token with ”Test successful” status
- Click the ”Confirm” button
- Review the address details in the confirmation dialog
- Click ”Confirm” to activate the address
After confirmation:
- ✅ The status changes to ”Bound”
- ✅ You can now make full withdrawals for this token
If the test withdrawal did not arrive or went to the wrong address:
- ❌ Click ”Reject” instead to reject the verification
- You will need to set up a new address
Removing an Address
If you need to delete an address that has not been verified yet (status is ”Sending test”):
- Go to your Payout page
- Find the token with the address you want to remove
- Click the delete button next to the address
- A confirmation dialog will appear: “This address is not verified yet. If deleted, you must add a new address to withdraw.”
- Click ”Delete” to confirm, or ”Cancel” to keep the address
After deletion:
- ✅ The address is removed
- ✅ The token status returns to ”No Address Set”
- You can add a new address at any time
[!NOTE] You can only delete addresses that are not yet verified (pending status). Once an address is bound (verified), contact your administrator if you need to change it.
Common Address Questions
Q: Can I use the same address for multiple tokens? A: Yes. When adding an address for a token, you can select an existing compatible address that is already bound to another token, as long as it is on a compatible network.
Q: Can I edit an address after adding it? A: No, for security reasons you cannot edit an address. You must delete it and add a new one.
Q: How long does the test withdrawal take? A: Test withdrawals are typically processed within 24 hours. Once received, confirm the transaction to complete the address binding.
Q: Can I add someone else’s address? A: While technically possible, this is not recommended. You should only add addresses you personally control.
Q: What if I enter the wrong address? A: Delete it immediately (before it is verified) and add the correct address. If a test withdrawal has already been sent to a wrong address, contact support immediately (though recovery may not be possible).
Q: What if my test withdrawal failed? A: If the status shows “Send test failed,” you can set up a new address for that token by clicking “Setup Address” again.
5. Profile Information
Your profile shows basic information about your account:
What You Can See
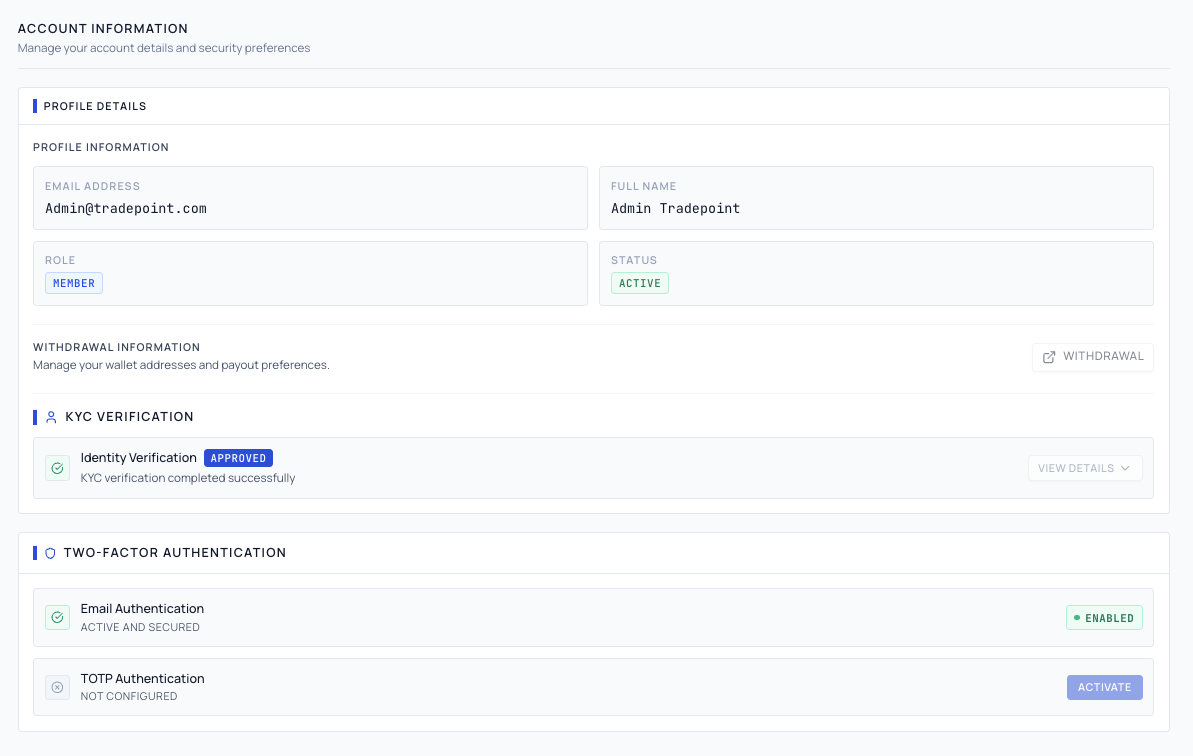
The Account page displays your profile details in the following sections:
Profile Information:
- Email Address: The email you use to log in
- Full Name: Your registered name (first and last name)
- Role: Your account role (Member, Admin, Operation, or Read Only)
- Status: Your account status (Active, Deactive, or Locked)
Withdrawal Information: Links to the Payout page for managing wallet addresses and withdrawal preferences (visible to members only, hidden for admin users).
Identity Verification (KYC): Your current KYC verification status and actions (visible to members only, hidden for admin users).
Two-Factor Authentication: Your email authentication status (always enabled) and TOTP two-factor authentication status with activation controls.
[!NOTE] If your account is locked, a red warning banner will appear at the top of the Account page. While locked, you can view your account information but cannot perform any actions such as changing your email, modifying 2FA settings, accessing withdrawals, or submitting KYC.
What You Cannot Change Yourself
For security reasons, most profile information is set by your administrator and cannot be changed directly:
- Full name
- Account status
- Disable TOTP Authentication (requires administrator)
How to Update Other Profile Information
If other information needs to be updated (e.g., you changed your name):
- Contact your system administrator or support team
- Explain what needs to be changed and why
- Provide supporting documentation (e.g., legal name change document)
- Wait for administrator approval - they may need to update your KYC information as well
6. Troubleshooting
KYC Issues
Problem: My KYC was rejected
- Solution: When KYC is rejected, your account is automatically locked. You cannot resubmit on your own.
- Read the rejection reason shown on your account page
- Contact support to unlock your account and request resubmission
- When resubmitting, common fixes include:
- Taking clearer photos with better lighting
- Ensuring documents are not expired
- Making sure your proof of address is recent (within 3 months)
- Double-checking that names and addresses match exactly across all documents
Problem: I can’t upload my documents
- Solution:
- Check file size (max 10MB)
- Use JPG, PNG, or PDF format
- Try a different browser
- Clear your browser cache
- Try from a different device
Problem: My verification is taking too long
- Solution:
- Most verifications take 1-3 business days
- If it’s been longer, contact your administrator
- Check your email for any requests for additional information
2FA Issues
Problem: My 2FA code doesn’t work
- Solution:
- Make sure you’re using the current code (not an expired one)
- Check that your phone’s time is set to automatic (Settings > Date & Time > Automatic)
- Ensure you’re looking at the right account in your authenticator app
- Try the next code if the current one is about to expire
Problem: I lost my phone
- Solution:
- If you saved your secret key, install the authenticator app on a new device and enter the key manually
- If you have neither, contact your administrator (this may take several days to resolve)
Problem: I can’t scan the QR code
- Solution:
- Make sure your phone’s camera has permission to access the camera
- Try holding your phone at different distances
- Make your screen brighter
- Use the “Enter key manually” option instead
Address Issues
Problem: I can’t add addresses (TOTP Required message)
- Solution: You must enable TOTP two-factor authentication first. See Section 3 for instructions.
Problem: Address validation fails
- Solution:
- Double-check that you selected the correct network
- Make sure you copied the entire address (no extra spaces, no missing characters)
- Some addresses are case-sensitive
- Verify the address directly from your wallet/exchange
- Only networks compatible with the selected token are shown
Problem: My test withdrawal hasn’t arrived
- Solution:
- Test withdrawals are typically processed within 24 hours
- If it’s been longer, contact your administrator
- Verify the address and network are correct
Problem: I added the wrong address
- Solution:
- Delete the incorrect address immediately (before it is verified)
- Set up a new address for the token
- If a test withdrawal was already sent to a wrong address, contact support urgently (recovery may not be possible)
Problem: My account is locked and I can’t manage addresses
- Solution: Contact your system administrator. Locked accounts cannot perform any actions including address management.
7. Security Best Practices
Protect Your Account
✅ DO:
- Enable 2FA as soon as possible
- Use a strong, unique password for your Google account
- Save your 2FA secret key separately
- Log out when using shared computers
- Regularly review your saved addresses on the Payout page for unauthorized entries
- Keep your phone and authenticator app secure with a PIN or biometric lock
- Use official wallet apps (download only from official sources)
- Double-check addresses before submitting withdrawals
- Contact support immediately if you notice suspicious activity
❌ DON’T:
- Share your 2FA codes with anyone (TradePoint staff will never ask for them)
- Share your authenticator app secret key
- Save your backup codes on your phone or in cloud storage
- Use the same password across multiple services
- Take screenshots of your 2FA codes and share them
- Add addresses you don’t personally control
- Click suspicious links in emails claiming to be from TradePoint
- Install authenticator apps from unofficial sources
Recognize Phishing Attempts
TradePoint will NEVER:
- Ask for your password via email or chat
- Ask for your 2FA codes
- Ask you to disable your 2FA
- Send you links to log in via email (always go directly to the official website)
- Request payment or fees to “unlock” your account
If you receive suspicious communications:
- Do not click any links
- Do not provide any information
- Go directly to the official TradePoint website
- Contact your administrator to verify
Protect Your Cryptocurrency
- Use hardware wallets for large amounts (e.g., Ledger, Trezor)
- Test with small amounts first when adding a new address
- Triple-check addresses before submitting any withdrawal
- Be aware of network differences - Ethereum vs Polygon vs BSC are all different
- Keep seed phrases offline - never store them digitally
- Don’t share your seed phrase with anyone, ever
Need More Help?
If you’re still having trouble after reading this guide:
- Check the FAQ section in the main manual
- Contact your system administrator - they created your account and can help with most issues
- Reach out to the support team - contact information should be provided by your administrator
- Provide specific details when asking for help:
- What you were trying to do
- What step you’re stuck on
- Any error messages you see
- Screenshots (blur any sensitive information)
This guide is maintained by the TradePoint team. Last updated: March 2026