User Payout Guide
A comprehensive guide to withdrawing your tokens and managing payout transactions on TradePoint.
1. Introduction
The Payout feature allows you to withdraw your token balances to external cryptocurrency wallets. Think of it as transferring money from your TradePoint account to your personal bank account - except instead of a bank account, you're sending cryptocurrency to your wallet.
What You Can Do
- Withdraw Tokens - Transfer your available token balances to your saved wallet addresses
- Track History - View all past and pending withdrawal transactions
- Multiple Networks - Withdraw to different blockchain networks (Ethereum, Polygon, BSC, etc.)
- Secure Process - Two-factor authentication protects every withdrawal
[!IMPORTANT]
Cryptocurrency transactions are irreversible. Once a withdrawal is processed and sent to the blockchain, it cannot be undone. Always double-check your addresses before withdrawing.
2. Prerequisites
Before you can make a withdrawal, you must complete these requirements:
Requirement 1: KYC Verification and Withdrawal Limits
Why Required: Withdrawal amounts are limited until your KYC (identity verification) is approved. Once approved, you have unlimited withdrawal capacity.
| KYC Status | Withdrawal Limit (USD) |
|---|---|
| Not Approved | Limited (platform-configured) |
| Approved | Unlimited |
[!NOTE]
The exact USD limit for non-approved accounts is configured by the platform administrator. Contact support if you need to know your current limit.
Requirement 2: Two-Factor Authentication (2FA/TOTP)
Why Required: 2FA adds an extra security layer to protect your funds from unauthorized withdrawals.
Status: TOTP must be Enabled
How to Check:
- Go to Account Settings > Security
- Look for "Two-Factor Authentication" section
- If it says "Active" ✅, you're ready
- If it says "Inactive" ❌, you must set up 2FA
[!IMPORTANT]
You cannot make withdrawals without 2FA enabled. This is a mandatory security requirement.
Requirement 3: Bind a Withdrawal Address
Why Required: You need to link a verified wallet address to each token before withdrawing. The binding process confirms you control the address.
How to Bind an Address:
[!IMPORTANT]
2FA must be enabled before you can enter an address. If 2FA is not set up, a warning modal will appear directing you to enable it first.
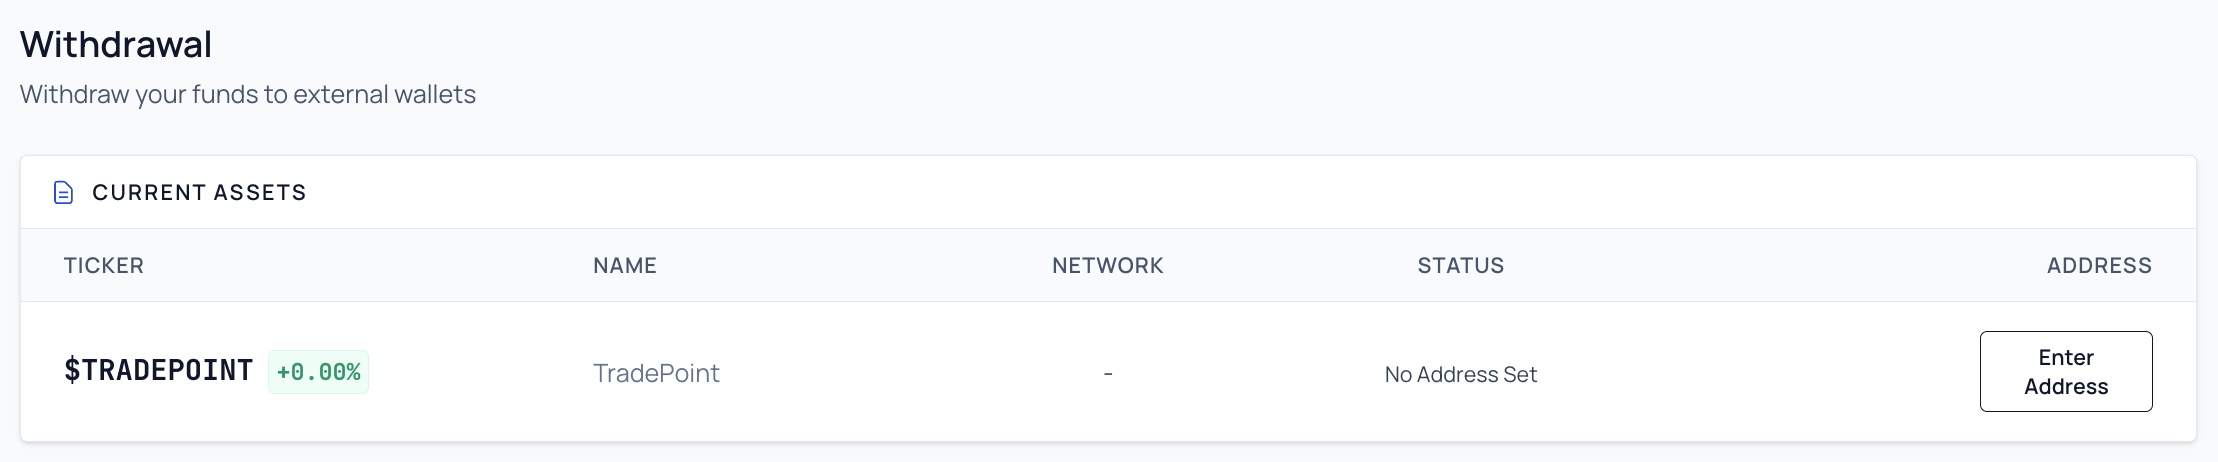
Step 1 — Find your token in the Current Assets table:
- Go to Payout from the main menu
- Look at the Current Assets table at the top of the page
- Find the token you want to set up — it shows "No Address Set" or "Rejected" in the Status column
- Click the "Enter Address" button on that row
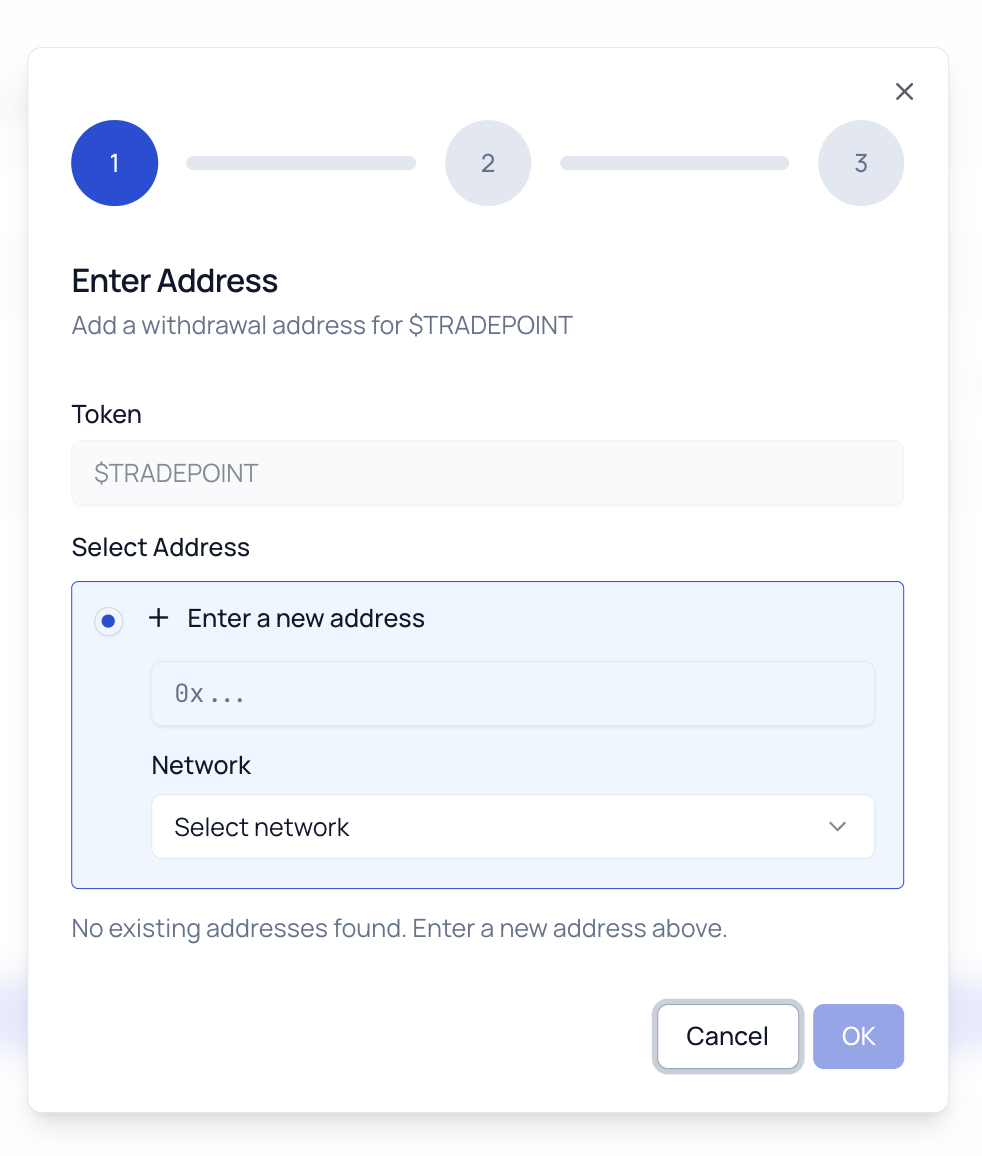
Step 2 — Enter your wallet address (Step 1 of 3 in the modal):
| Field | Notes |
|---|---|
| Token | Pre-filled automatically (the token you selected) |
| Wallet Address | Your destination wallet address — format is validated automatically |
| Network | Select the blockchain network from the dropdown |
Click "OK" to proceed.
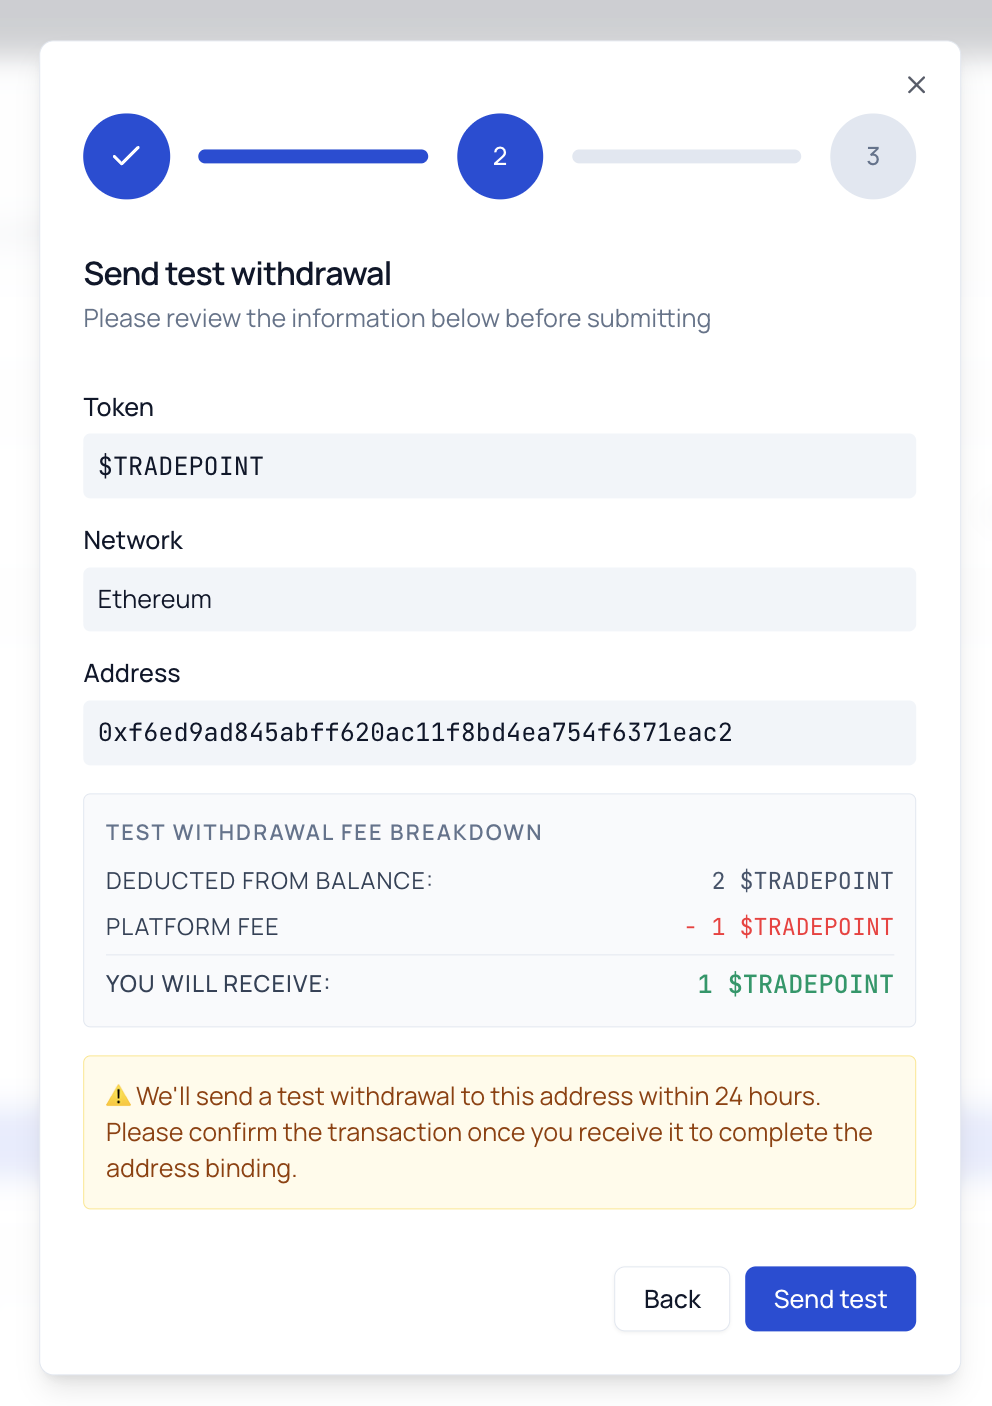
Step 3 — Review and send test (Step 2 of 3 in the modal):
Verify the Token, Network, and Address are correct. Review the Test Withdrawal Fee Breakdown to see how much the test withdrawal will cost. Click "Send test" to continue.
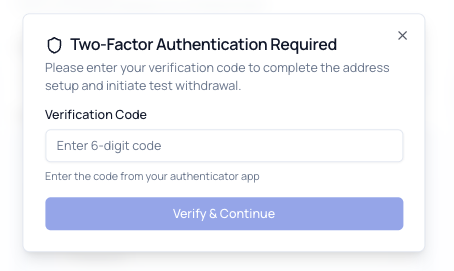
Step 4 — Enter 2FA code (Step 3 of 3 in the modal):
Enter your 6-digit TOTP code and click "Verify & Continue". This will:
- Create your withdrawal address
- Automatically initiate a small test withdrawal to confirm you control it
Step 5 — Wait for the test to process:
Your token's status in the Current Assets table changes to "Pending Verification". An admin will review and process the test withdrawal. Once the test transaction has been sent, the status changes to "Verify Address".

Step 6 — Confirm receipt and bind:
- Check your external wallet for the small incoming test transaction
- Return to the Payout page
- Click the "Confirm" button in the Current Assets table
- A modal shows the test transaction details — click "Confirm and Bind"
- Your address status changes to "Bound" ✅ and is ready for withdrawals
Address Statuses in the Current Assets Table:
| Status | Meaning |
|---|---|
| No Address Set | No address configured for this token |
| Pending Verification | Address submitted, awaiting admin review and test withdrawal |
| Verify Address | Test transaction sent — check your wallet and click "Confirm" to complete binding |
| Bound | Address verified and ready for withdrawals |
| Rejected | Address was rejected by admin, or the test step was rejected — you can submit a new address |
[!IMPORTANT]
Only Bound addresses can be used for withdrawals. Addresses in "Pending Verification" or "Verify Address" status are not yet available in the withdrawal form.
[!TIP]
Submit your withdrawal address well in advance — admin processing can take time. Plan ahead before you need to withdraw.
Summary of Prerequisites
| Requirement | What You Need | Where to Complete |
|---|---|---|
| ✅ KYC Status | Approved = unlimited withdrawal; Not Approved = limited | Account > Identity Verification |
| ✅ 2FA Enabled | Authenticator app set up and active | Account > Security |
| ✅ Bound Address | At least one Bound withdrawal address for your token | Payout > Current Assets |
When All Requirements Met:
- You can select tokens and addresses
- You can enter withdrawal amounts
- The "Withdraw" button will be active
If Requirements Not Met:
- Clicking form fields will show a modal explaining what's needed
- Links will guide you to complete missing requirements
3. Understanding Your Available Balance
What is Available Balance?
Your available balance is the amount of tokens you can withdraw right now. This is your actual balance from the platform's accounting system, reflecting:
- ✅ Tokens distributed to you and claimed
- ✅ Trading profits that have settled
- ✅ Vested tokens that are unlocked
- ❌ Excludes tokens locked in pending operations
- ❌ Excludes unclaimed tokens
- ❌ Excludes unvested tokens
- ❌ Excludes tokens currently in pending withdrawals
Where to See Your Balance
In the Payout Page:
- Navigate to Payout from the main menu
- Click the "Select Token" dropdown
- Each token shows its balance next to the name
Example:
USDT (Tether) (Balance: 1,500.000000)
ETH (Ethereum) (Balance: 0.500000)
After Selecting a Token:
-
Below the "Withdraw Amount" field, you'll see:
Available: 1,500.000000 USDT
Only Tokens with Balance Are Shown
Important: The token dropdown only shows tokens where you have both a positive balance and an Active (Bound) withdrawal address for that token. Additionally, the token must have a minimum withdrawal amount and withdrawal fee configured by the platform.
If you don't see a token:
- You may have a zero balance for that token
- You may not have a Bound address for that token — go to the Payout page, look at the Current Assets table, and complete the address binding process
- The token may not be configured for withdrawals yet (no minimum withdrawal or fee set by the platform)
- Contact support if you believe you should have a balance
4. Withdrawal Process
Follow these steps to withdraw your tokens to an external wallet.
Step 1: Navigate to Payout Page
- Log into your TradePoint account
- From the main menu, click "Payout"
- You'll see the Withdrawal Form and Transaction History
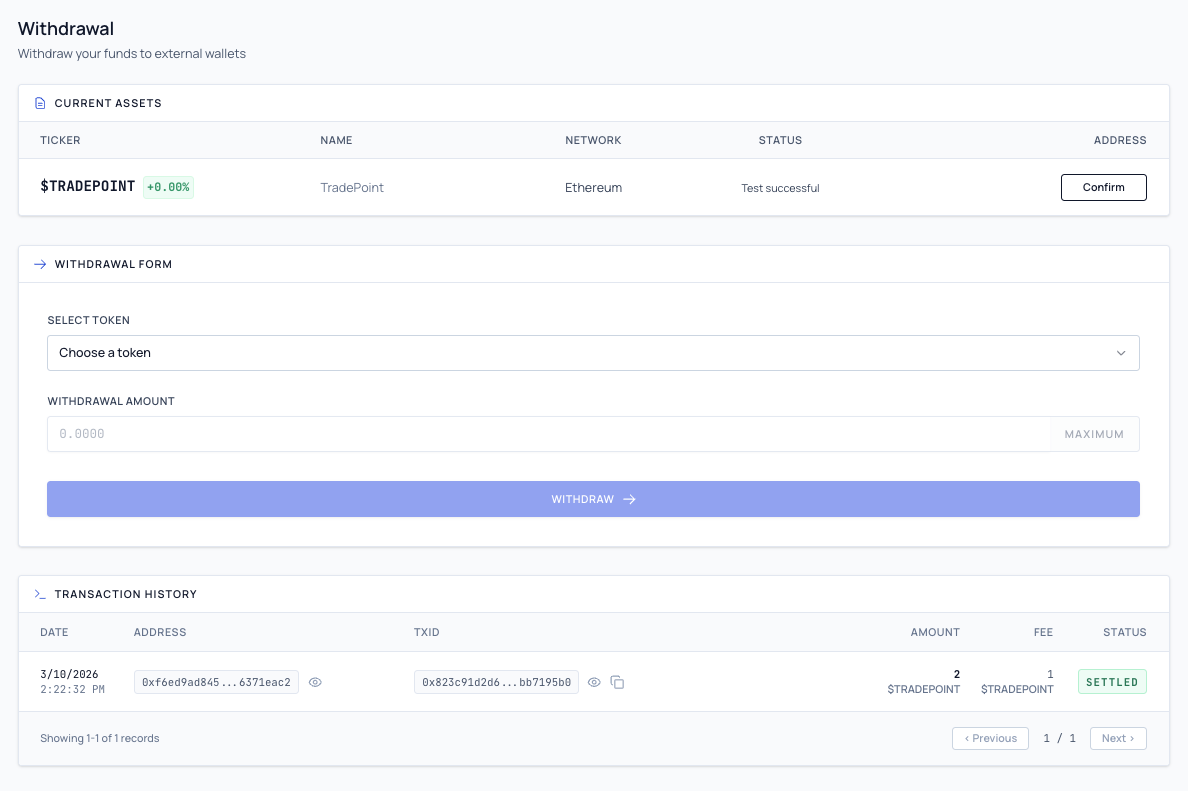
Step 2: Select Your Token
- Click the "Select Token" dropdown
- You'll see only tokens that have both a positive balance and a Bound address
- Each token shows:
- Token Name (e.g., "Tether")
- Token Symbol (e.g., "USDT")
- Your Balance (e.g., "Balance: 100000.000000")
- Your Bound Address (truncated, e.g., "0x742d...f44e")
- Click on the token you want to withdraw
Note: Once you select a token, its Bound address is automatically applied to the withdrawal. There is no separate address selection step.
[!TIP]
If you don't see a token, either your balance is zero, you don't yet have a Bound address for it (see Requirement 3 above), or the token is not configured for withdrawals.
Step 3: Enter Withdrawal Amount
- Click in the "Withdraw Amount" field
- Type the amount you want to withdraw
- Or click the "Max" button to withdraw your entire available balance
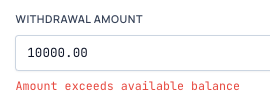
Important Validation Rules:
✅ Amount must be:
- Greater than zero
- Greater than or equal to the token's minimum withdrawal amount
- Less than or equal to your available balance
- Greater than the platform withdrawal fee
- Result in a positive amount after fees are deducted
❌ Common Errors:
Error: "Amount exceeds available balance"
- Solution: Reduce the amount
Error: "Amount is below the minimum withdrawal amount"
- Solution: Enter an amount equal to or above the minimum withdrawal threshold for this token
Error: "Amount must be greater than the platform fee of X USDT"
- Solution: The withdrawal amount must exceed the fee so you receive something after the fee is deducted
Example Scenario:
Your Balance: 100 USDT
Minimum Withdrawal: 10 USDT
Withdrawal Fee: 5 USDT
Minimum Valid Amount: 10 USDT (meets minimum)
Maximum Valid Amount: 100 USDT

If you enter 100 USDT:
  You will receive: 95 USDT (100 - 5 fee)
[!TIP]
Always check how much you'll receive after fees before confirming. The confirmation screen will show you the exact amount.


Step 4: Review and Click Withdraw
Before clicking "Withdraw", verify:
| Check | What to Verify |
|---|---|
| ✅ Correct Token | Is this the token you want to send? |
| ✅ Correct Address | Is this the right destination wallet? |
| ✅ Correct Network | Does the network match your wallet? |
| ✅ Correct Amount | Is the amount what you intended? |
| ✅ Fees Understood | Do you know how much you'll receive after fees? |
When Ready:
- Click the "Withdraw" button
- The platform will check your withdrawal limit against your KYC status
- If your limit is reached, a modal will appear explaining the KYC requirement
- If the limit check passes, a confirmation modal will appear
[!WARNING]
This is your last chance to review before the withdrawal is requested. Double-check everything!
Step 5: Review Transaction Summary
A confirmation modal will appear showing:
Transaction Summary Card:
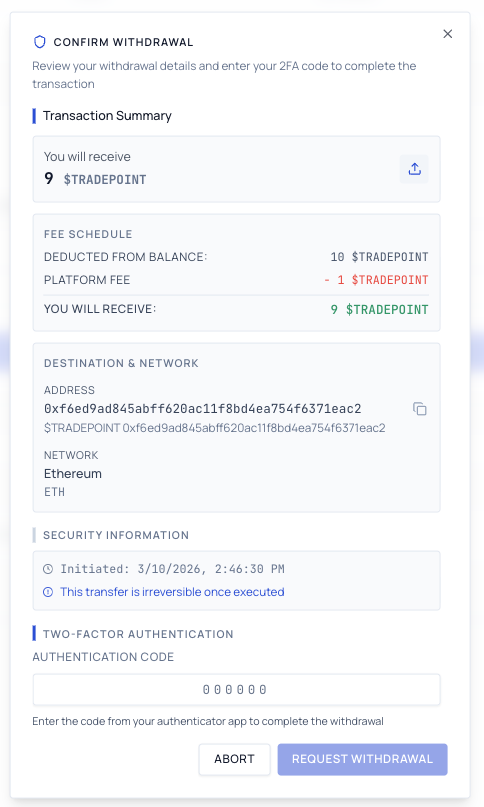
What to Check:
- "You will receive" - Confirm this is the amount you expect (after fees)
- Destination Address - Verify this is your correct wallet address
- Network - Confirm the blockchain is correct
- Fee Breakdown - Understand what's being deducted
Step 6: Enter 2FA Code and Confirm
At the bottom of the confirmation modal:
- Open your authenticator app on your phone
- Find the TradePoint entry
- You'll see a 6-digit code (e.g.,
123 456) - Type this code into the "Authentication Code" field
- Click "Request Withdrawal"
Code Requirements:
- Must be exactly 6 digits
- Must be the current code (changes every 30 seconds)
- Must be entered before it expires
If Code Expires While Typing:
- Wait for the new code to appear
- Enter the new code instead
[!TIP]
If the code is about to expire (timer almost at zero), wait for the next code to avoid having to re-enter it.
Error Messages:
❌ "Invalid or expired code"
- Cause: Code was typed incorrectly or expired
- Solution: Wait for the next code and try again
❌ "TOTP verification failed"
- Cause: Technical issue with 2FA system
- Solution: Ensure your phone's time is set to automatic, or contact support
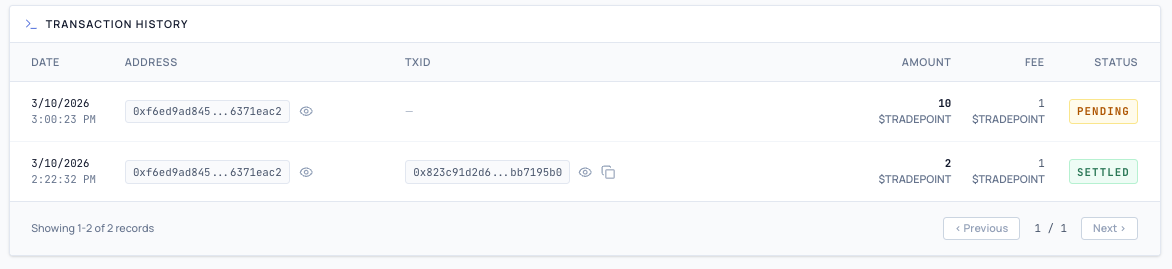
Step 7: Withdrawal Submitted
Once you click "Request Withdrawal" and the 2FA code is verified:
- Success modal appears with the title "Withdrawal Requested"
- Your balance updates immediately - The withdrawn amount is deducted
- Transaction appears in History with status "PENDING"
- Form resets - Ready for another withdrawal if needed
What Happens Next:
- Withdrawal is Queued ⏳
- Your withdrawal enters the admin review queue
- Status: PENDING
- Funds are locked and cannot be used
- Admin Reviews Request 👤
- Platform administrators verify the withdrawal
- They check for compliance and withdrawal limit eligibility
- This typically takes 1-3 business days
- Admin Processes Withdrawal ✅
- Admin clicks "Process Withdrawal" in their dashboard
- Transaction is sent to the blockchain
- Status changes to COMPLETED (displayed as "SETTLED" in your history)
- You Receive Your Tokens 🎉
- Tokens arrive in your external wallet
- Blockchain confirmations may take a few minutes to hours depending on network congestion
- You can track the transaction on a blockchain explorer (if transaction hash is provided)
[!NOTE]
Processing Time: Withdrawals typically complete within 1-3 business days, but this can vary based on admin availability and compliance checks.
5. Transaction History
Your transaction history shows all past withdrawal requests. Each entry displays:
- Date and time of the request
- Token and amount withdrawn (gross amount before fees)
- Fees deducted
- Destination address
- Status
Transaction Statuses
| Status | Displayed As | Meaning |
|---|---|---|
| PENDING | PENDING | Withdrawal is queued, awaiting admin processing |
| COMPLETED | SETTLED | Successfully processed and sent to the blockchain |
| FAILED | FAILED | Withdrawal could not be processed — contact support |
| CANCELED | CANCELED | Withdrawal was canceled (within the cancellation window) |
This guide is maintained by the TradePoint team. Last updated: March 2026